India eTourist Visa Application Step-by-Step Guide
If you are considering travelling to India, Luxe Wanderer strongly advises that you read through the SmartTraveller website ( https://www.smartraveller.gov.au ) to check for any health & safety advisories. This is an Australian government website and can provide a myriad of details to ensure you are fully prepared and up to date on all the latest information. You can subscribe to their emailed travel news and updates HERE.
BEFORE STARTING YOUR APPLICATION
Scroll through the screenshots of the application process below and make sure you first have all your information ready. If you take too long to fill in each page they tend to time out, resulting in you having to log back in via the “Complete Partially Filled Application Form” tab and having to re-fill in the page you were last on. It can become quite frustrating so it’s best to be prepared from the beginning to avoid this.
Initiating Your Application
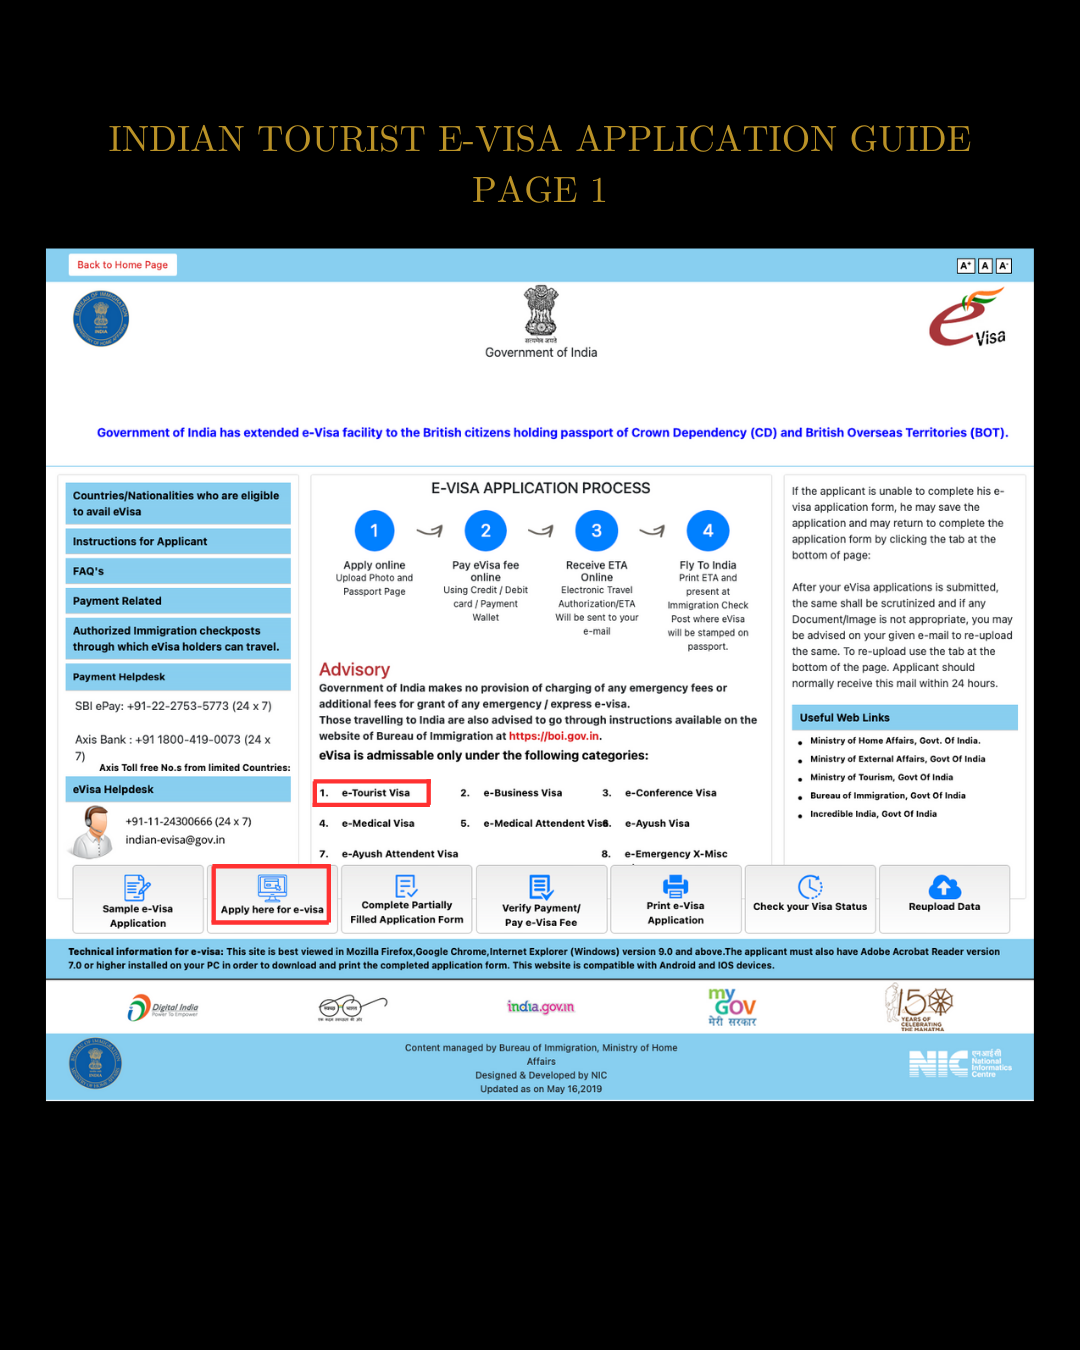
Go to: Indian Visa Online which is the official visa portal for India
You can either click the linked words above or copy and paste the following web address: https://indianvisaonline.gov.in/evisa/tvoa.html
Click on the second tab that says “Apply here for e-visa” which I have put a red box around in the screenshot on the left of this page.
Please note: For e-Tourist and e-Business visa, Applicants of the eligible countries/territories may apply online minimum 4 days in advance of the date of arrival.
I would advise applying a minimum of 2 weeks in advance to ensure you have time to address any issues/delays should you have any.
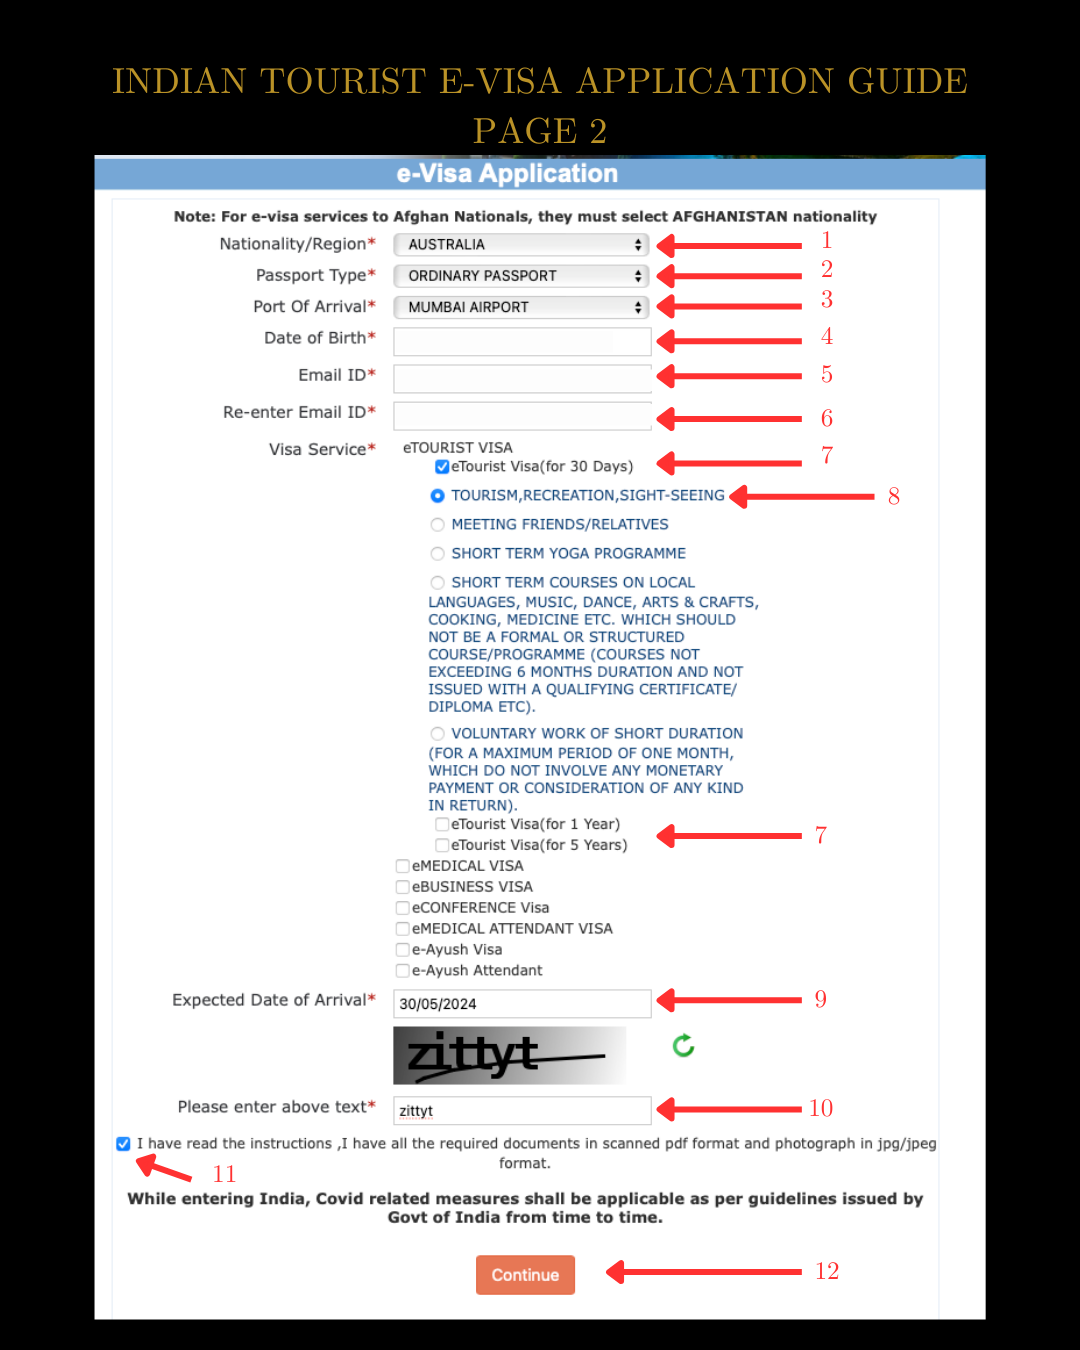
Application Page One
Select your nationality.
Select your passport type.
Select where you will enter India. Scroll through the list and choose either the airport or seaport or border check point.
Enter your date of birth (DD/MM/YYYY)
Enter your email address
Re-enter your email address
Select your visa type. As you can see, for the eTourist option you have the choice of 30 days, 1 year or 5 years. If you plan to make multiple trips, then select the lengthier options to avoid having to re-apply every time you go. It may also work out to be cheaper.
Select your reason for travelling as per the list.
Enter the date you plan to arrive in India (Format: DD/MM/YYYY)
As a security precaution you need to enter the letters in the photo exactly as it is displayed. Note: These are ALWAYS case-sensitive, so always copy exactly.
Don’t forget to tick the box to confirm you’ve read the instructions and have all your documents.
Click the “Continue” button to proceed to the next page.
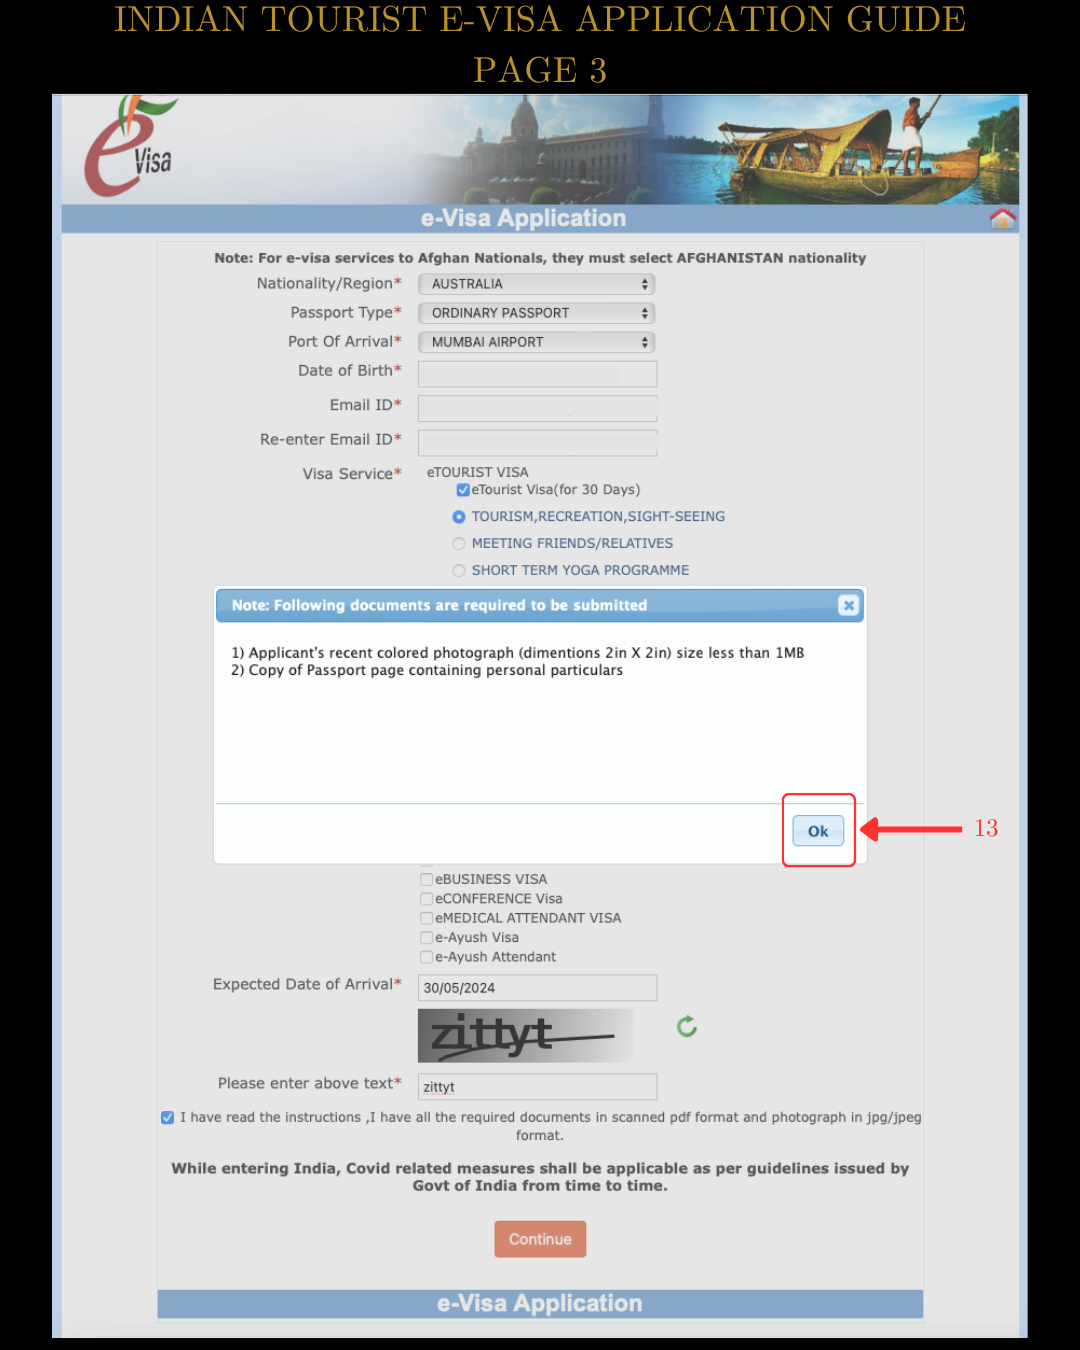
Application Page Two
13. Read the message and make sure you have your both your photograph and passport in digital form so you van upload.
For your coloured photograph I would suggest Australian travellers go to their local Australia Post, with the exact dimensions written down, and have them take your photo for you for a small fee. You can do it at home yourself if you feel comfortable but the staff at the post office are trained to take passport and visa photos and have everything all set up in readiness already. It’s much easier and that way it will be done correctly the first time rather than having your visa denied because your photo was taken incorrectly.
For your passport, you can either use a scanner or take a photo of your identity details page yourself with your mobile phone. I find using my phone for this easiest. just make sure it’s well-lit to ensure all the details are clearly visible.
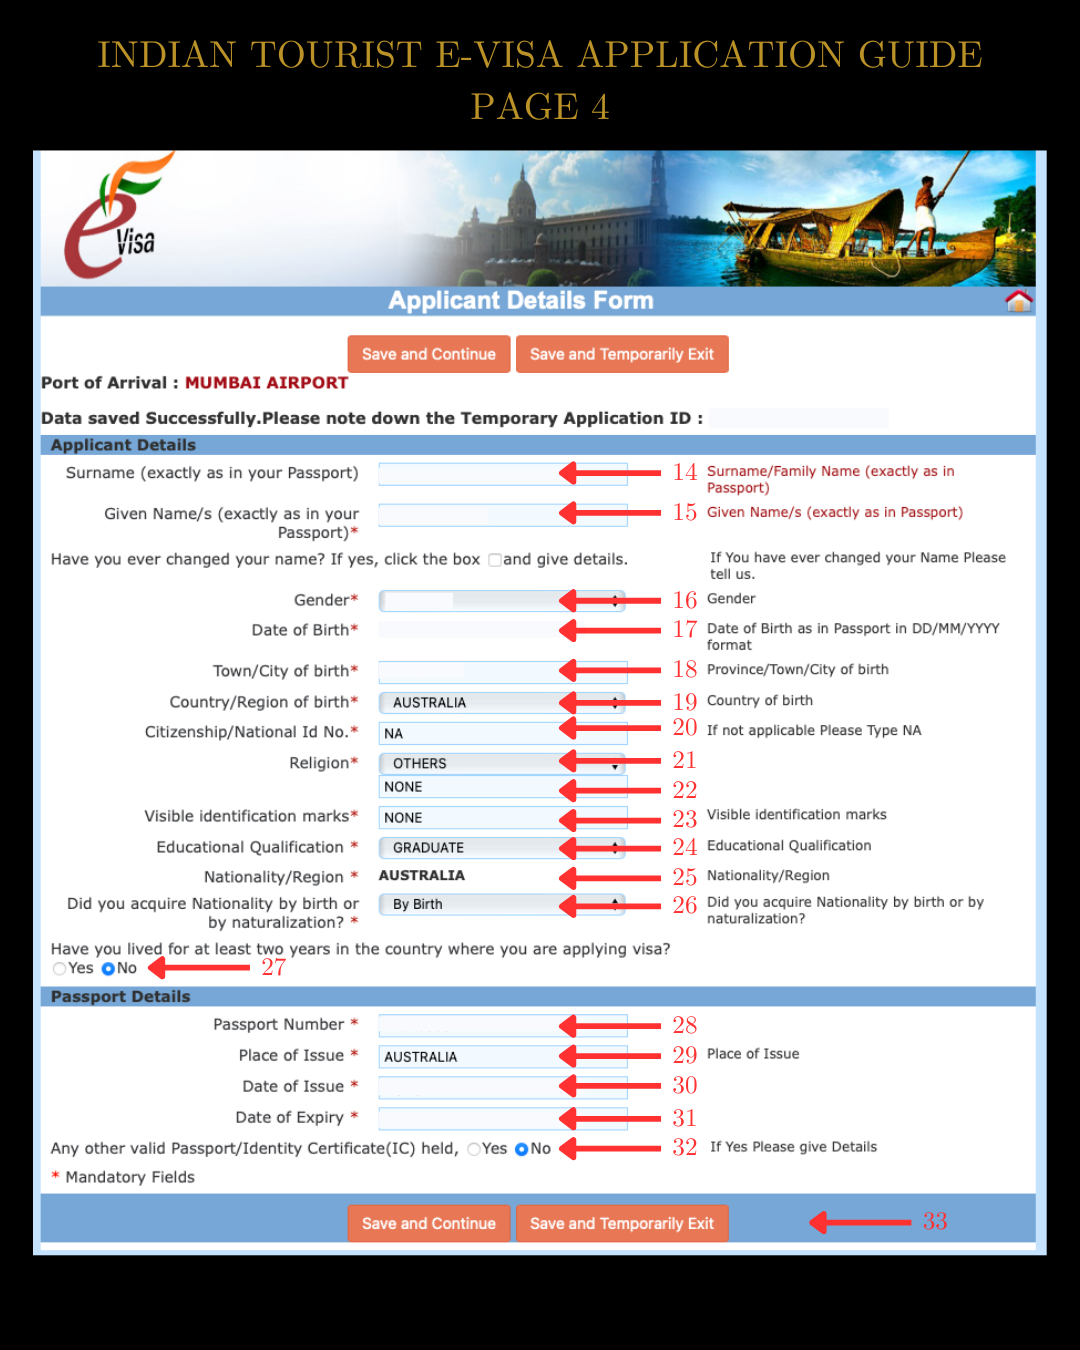
Application Page Three
FIRST! Write down your Temporary Application ID number from the top of the page. If you take too long to fill in a page, the page will error out and send you back to the home page, where you will need to log back in via “Complete Partially Filled Application Form” using your temporary ID number.
14. Type in your Surname
15. Type in your First and Middle names
16. Select your gender in the drop-down menu. You can select from “Female”, “Male” or “Transgender”. I would personally have this match my passport to ensure my application isn’t denied and/or I don’t have issues upon entry to India due to information differing from my ID documents. However, this is your choice.
17. Your date of birth should already be here as you already entered it on the previous page.
18. Enter the town/city of where you were born. If you were born in another country but are applying on your Australian passport for example, write where in the world you were actually born.
19. Enter your the country where you were born. If you were born in another country but are applying on your Australian passport for example, write where in the world you were actually born.
These fields are intended to record the place of your birth and do not reflect your current nationality or citizenship. Your current citizenship and the details of your passport will be entered further down the page where it asks for your nationality or passport information.
20. Just type “NA” here.
21. Select your religion from the drop down menu.
22. If not listed you can select “Others” and type it in if you have one. If you’re not religious, just write “none” as I have in the screenshot.
23. “Visible Identification marks” generally means moles, birthmarks, permanent scars etc. which are visible and can be shown if asked for by the Indian Immigration Authority. Alternatively, you could write “none” should you not have anything of note.
24. Select from the dropdown menu of “Educational Qualification”. Select the most relevant, don’t stress if it isn’t exact. Just get as close as you can with what’s available.
25. Your Nationality/Country will already be here after filling it in earlier.
26. You can choose the most applicable from the dropdown menu here. You may have been born in another country from where you currently hold citizenship and a passport.
27. Select “Yes” or “No” here regarding if you have lived in Australia (or the country you are applying from) for a minimum of 2 years.
28. Type in your passport number exactly as it appears in the your passport.
29. The country that provided the passport, eg, “Australia”.
30. Date of issue as written in your passport (DD/MM/YYYY).
31. Date of expiry as written in your passport (DD/MM/YYYY).
32. If you have duel citizenship and have multiple passports, you'll need to fill in the same details as above but matching the additional passport.
33. Click either button depending on if you would like to continue on or come back to your application at a later time.
Application Page Four
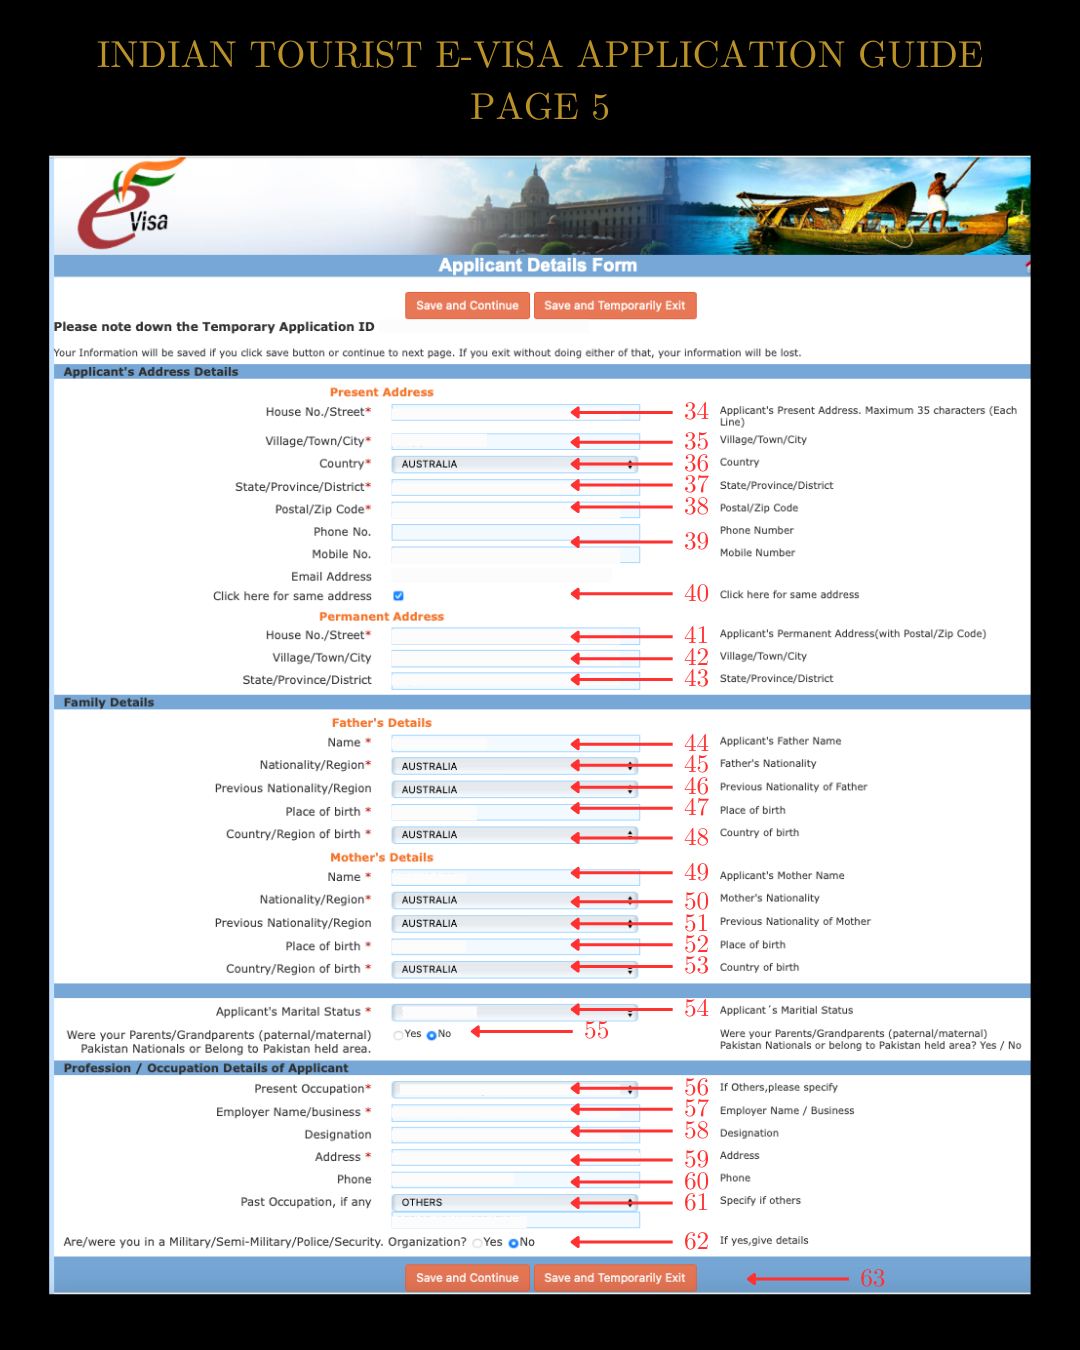
34. Type in your home number and street where you currently live.
35. Type in your town/suburb where you currently live.
36. Select your country where you currently live.
37. Enter the state in which you currently live.
38. Enter the postcode for where you currently live.
39. Enter your phone number in one of the two boxes. it can be your home landline or your mobile. It doesn’t need to be both, just one will do. No need for the country code, just enter it like you would type it into your phone.
40. If you have no other home address, tick the box to skip filling in the next few boxes under “permanent address”. If you have another address (perhaps you move around a lot and use a family members address for your mail and such) fill in boxes 41, 42, 43 with that information like above.
44. Type in your father’s/parent’s full name (first, middle, last).
45. Choose the country that would match their passport for citizenship and permanent residence.
46. If they immigrated from a different country, select that country if you know it. If not, select the same one as in box 45, where they live. The box has no red asterisk so it’s not required information.
47. Type in their place of birth (the town/suburb they were born).
48. Select the country they were born from the dropdown menu.
49 - 53. Do the same thing you just did for your mother/other parent in boxes 49 - 53.
54. Select your marital status in the drop down menu. Single, Married or Divorced.
55. Select yes or no here
56. Select from the drop down menu your current occupation. If it’s not listed, you can select “others” and type it in.
57. If you are employed/run your own business, type in the business name.
58. Designation means your role level. So if you have your own business you could enter “owner” or “CEO”. However, the box does not have a red asterisk next to it, meaning it’s not required and can be skipped.
59. Type in the address of your workplace. If you have your own business, just enter your registered address, even if it’s your home address.
60. Type in the business phone number here. but again. no red asterisk so you can skip it.
61. This box is also not required. But if you had a different type of job before whatever you have now, you can add it in. If you’re retired, this could be the job you had before you retired, if you had one.
62. Don’t forget to select “Yes” or “No” here.
63. Click either button depending on if you would like to continue on or come back to your application at a later time.
Application Page Five
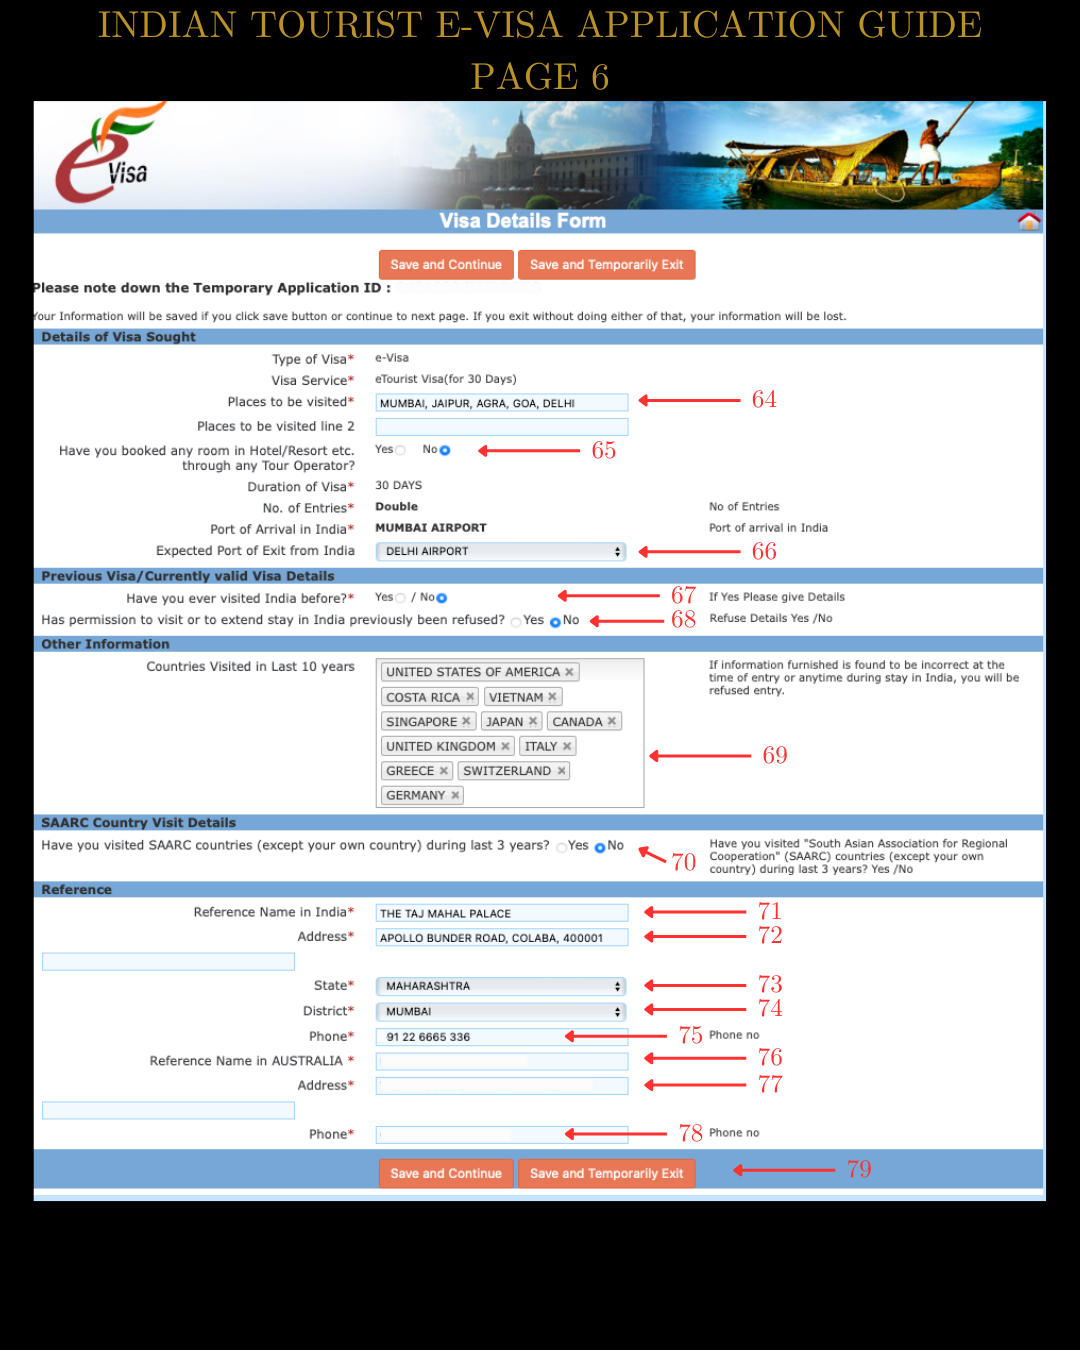
64. Type in the main cities where you plan to go.
65. If you are part of a tour, you’ll need to select “yes” here and provide their details. If engaging in free travel / self-guided travel, select “no”.
66. Select the airport/seaport/border crossing you plan to exit India from via the drop down menu. If your plans change through, it’ll be fine, they’re more concerned with how you enter than how you exit.
67. Another “yes” or “no” question here. If you answer “yes” just fill in the details of your last trip as asked.
68. Have you had an Indian visa ever denied or Indian visa extension denied in the past? “Yes” or “No” here. If “yes” they’ll want to know why.
69. Just go through all your passport stamps here and make sure all the countries you’ve previously been in the last 10 years is listed. I did this visa application as a sample only so I just selected a few for example purposes.
70. SAARC has eight member countries (Afghanistan, Bangladesh, Bhutan, India, Maldives, Nepal, Pakistan and Sri-Lanka). If “yes” you’ll need to provide travel details.
71. Your reference can be your first hotel if you don’t know anyone in India. Therefore, make sure you make at least a hotel reservation for your first night’s stay to ensure you can both fill in this area and your arrival card when you fly into India. Make sure you have their information handy in your carry-on so you don’t have issues upon border entry. Reserve the room first in case the hotel you planned on staying isn’t available.
72. I typed in the hotel name into google here to ensure I had the address correct. I’d suggest doing the same.
73. Match the state to the google address.
74. Match the district to the google address.
75. Just put in the main phone number, don’t include a “+” sign as the form won’t allow it.
76. Enter the name of your emergency contact person in Australia here.
77. Enter the address of your emergency contact person in Australia here. You can use both boxes (line 1 and 2) to complete the address.
78. Enter the mobile number of your emergency contact person in Australia here.
79. Click either to button depending on if you would like to continue on or come back to your application at a later time.
Application Page Six
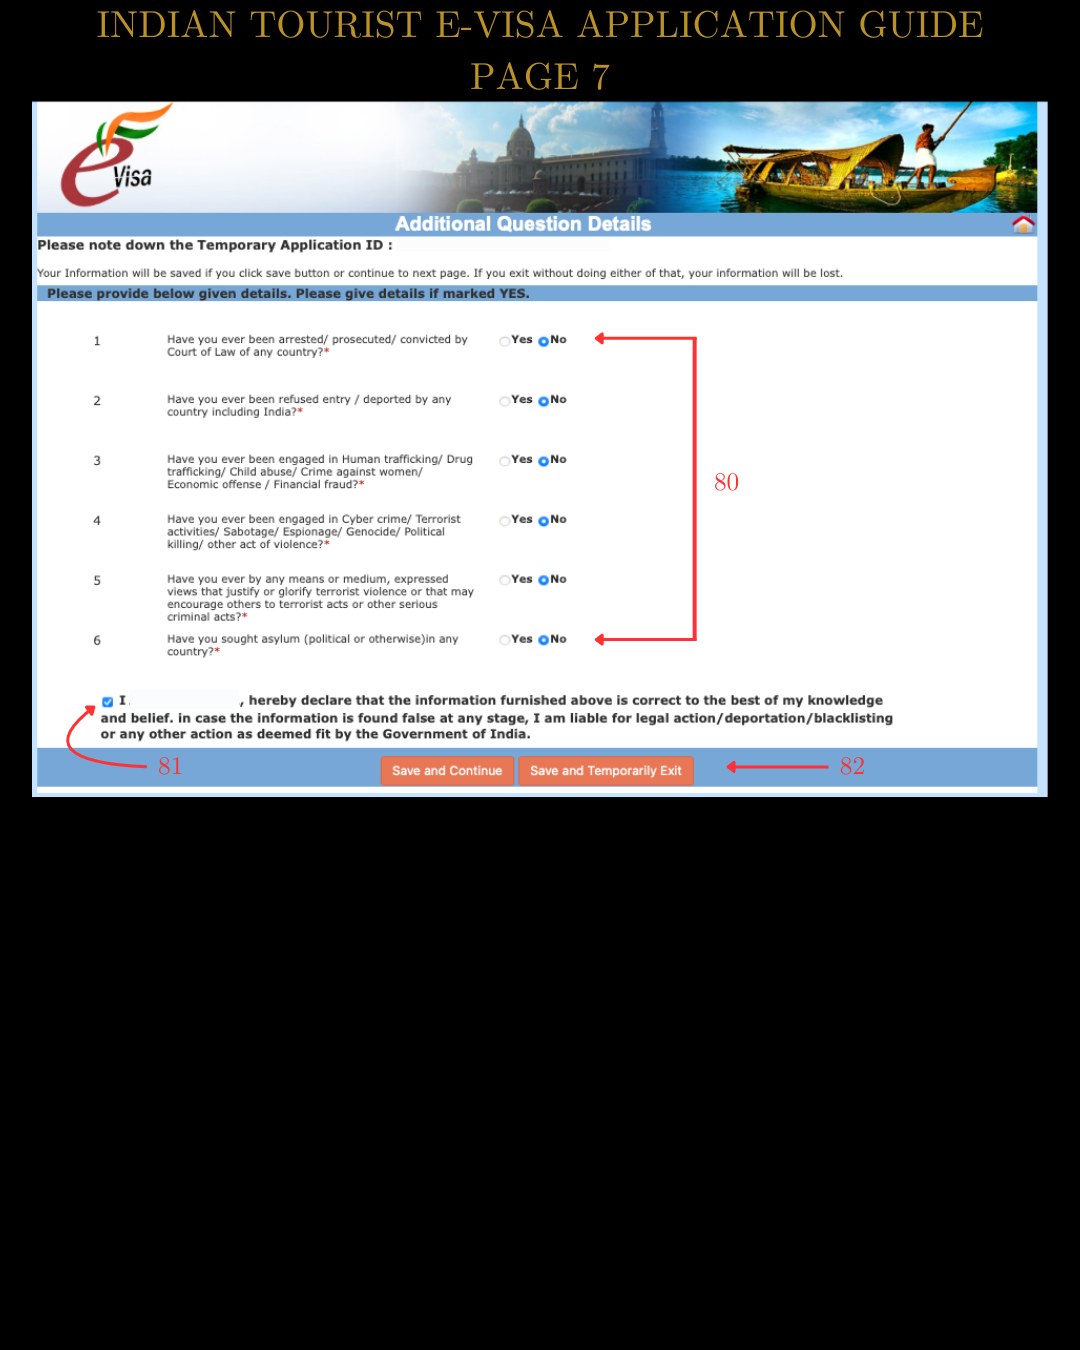
80. These are all simple “yes” or “no” questions. If you need to answer “yes” for any of them, you’ll need to fill in the requested details and likely have a follow up interview at the visa office/embassy/consulate before you are approved. Therefore, applying well in advance of your travel for your visa is recommended just in case.
81. Make sure you tick this box, you cannot continue on if you don’t.
82. Click either button depending on if you would like to continue on or come back to it at a later time.
Application Page Seven & Eight
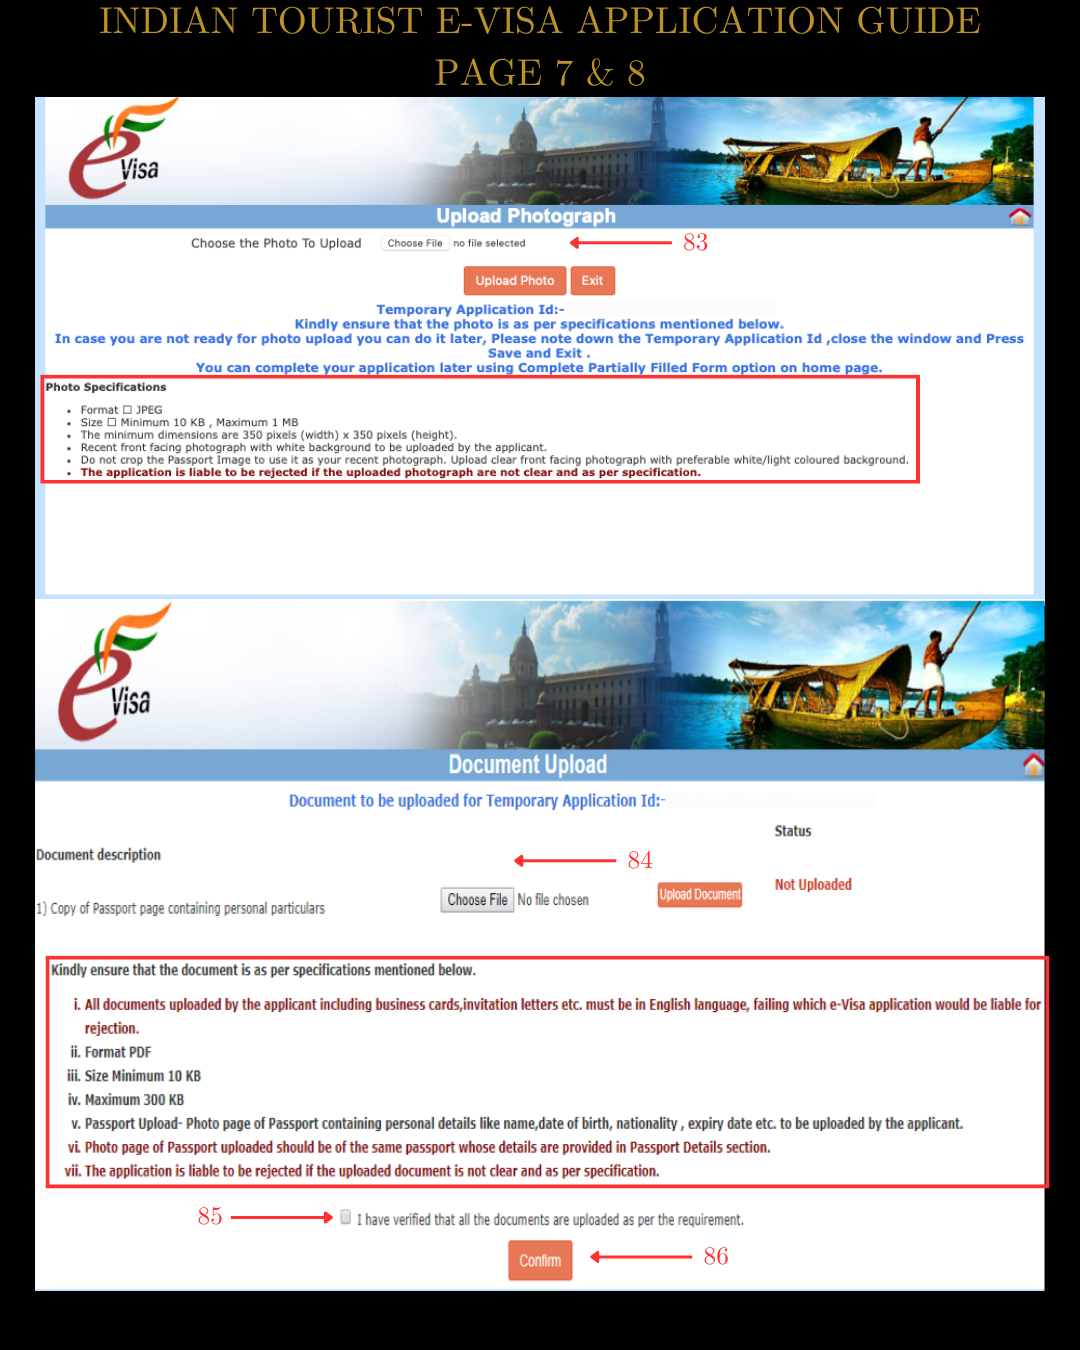
83. Click on “Choose File” to select the PDF formatted photo of your passport identity page from your saved documents on your device.
84. You can take a photo with your phone or use a scanner connected to a computer. Just make sure the final format for uploading the image of your passport identity page is in PDF format as the site requests.
85. Click the box to declare that the documents have been uploaded correctly, as per the site’s instructions.
86. Click “confirm” to move on to the next page.
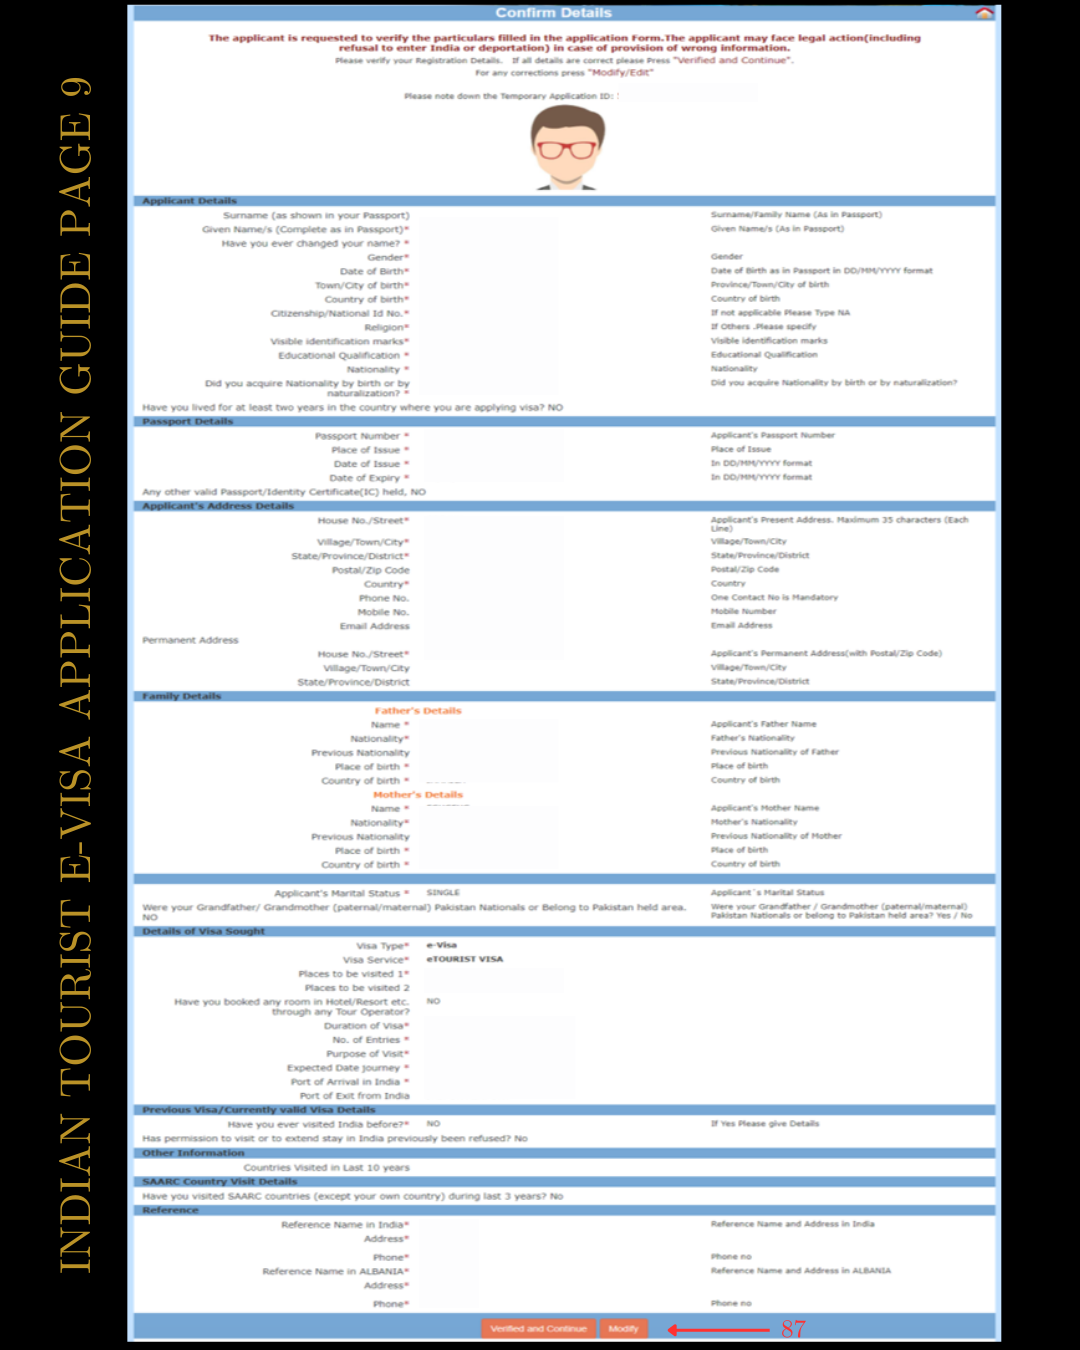
Application Page Nine
87. Review all the details of your visa carefully as you are solely responsible for any mistakes as per Indian Visa Online. Any mistakes can be corrected by clicking on the “Modify” button at the bottom of the page. Once you have confirmed at that all your details are correct, click “Verified and Continue” at the bottom of the page.
If there is a mistake and you’ve submitted everything you can contact the e-visa support centre for assistance at least 24 hours before the journey date.
Email: indian-evisa@gov.in
Phone: +91 11 24300666
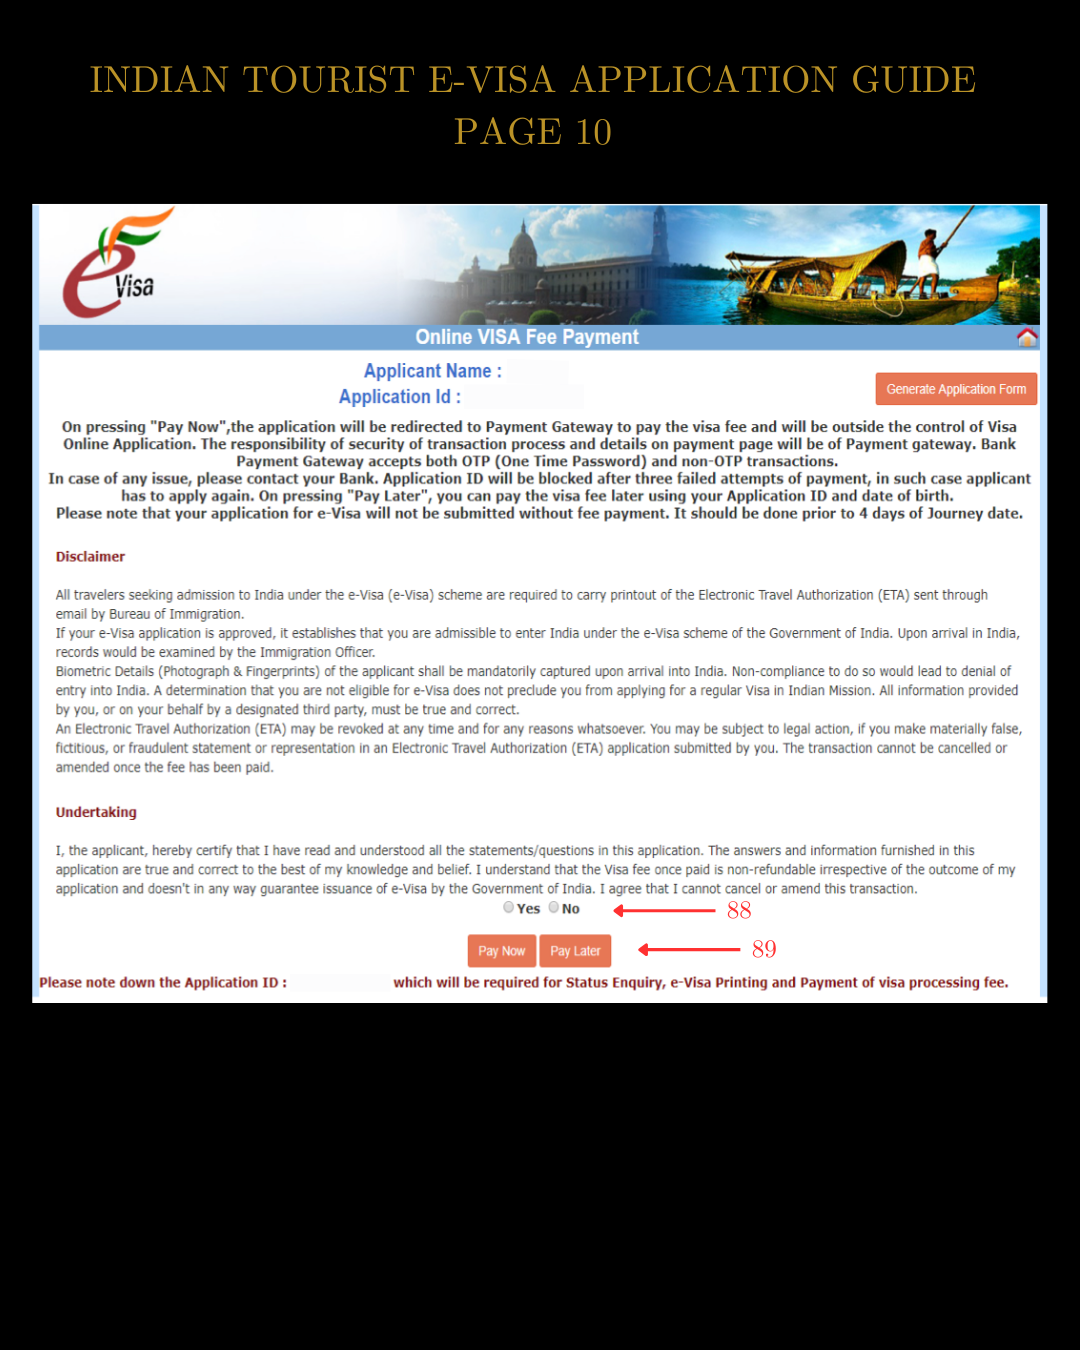
Application Page Ten
88. Read the information on the page and select “Yes”
89. Select either “Pay Now” or “Pay Later” depending on your readiness. just be mindful that your application won’t be lodged until you pay. Be mindful that this fee is non-refundable
There are two options for payment. Either SBIePay or Axis Bank.
SBIePay is the Payment Aggregator service of State Bank of India, India’s largest bank and the amongst top 50 Banks in the world. They accept Credit or Debit cards issued by Visa, Mastercard or PayPal and are certified with the Payment Card Industry Data Security Standard (PCI DSS).
Axis Bank is an Internet Payment Gateway Solution that allows you to make payments on a 24 X 7 basis from around the world. It accepts Credit or Debit cards issued by Visa, MasterCard and Maestro cards. Axis Bank is also certified with the Payment Card Industry Data Security Standard (PCI DSS).
Both options charge a 2.5% card fee.
SBIePay charges 3.5% for PayPal payments.
If you have further questions regarding payment go back to the home page of Indian Visa Online and click on the “Payment Related” tab on the left side of the page.
Frequently Asked Questions
Please note that the questions and answers in this FAQ are direct from the official Indian Visa Online website.
They have been included here for your convenience.
-
The following are the eligibility conditions for availing e-Visa services-
i. Nationals of countries listed on the e-Visa website https://indianvisaonline.gov.in/evisa/ are eligible to apply for e-Visa Services.
ii. Foreigners whose sole objective for visiting India is
(a) Recreation and sightseeing
(b) Casual visit to meet friends and relatives
(c) Attending short term yoga programme or short term courses on local languages, music, dance, arts & crafts, cooking, medicine etc. which should not be a formal or structured course/programme
(courses not exceeding 6 months duration and not issuing a qualifying certificate/diploma etc. to the participants)
(d) Voluntary work of short duration (for a maximum period of one month, which do not involve any monetary payment or consideration of any kind in return)
(e) Medical treatment, including treatment under Indian systems of medicine
(f) As attendant to e-Medical visa holder
(g) Business purpose
(h) Attending a conference/ seminar/ workshop.
iii. Passport should have at least six months validity at the time of making application for grant of e-Visa and a re-entry permit, if that is required under the law of the country of nationality of the applicant.
The passport should have at least two blank pages for stamping by the Immigration Officer.
iv. The foreigner should have return ticket or onward journey ticket, with sufficient money to spend during his/her stay in India.
v. Foreigners of Pakistani origin or having Pakistani Passport are not eligible for e-Visa. Foreigners who are not Pakistani nationals, but whose parents or grandparents (either paternal or maternal) was born
in, or was permanently resident in Pakistan, are also not eligible for e-Visa. They may apply for regular Visa at Indian Mission.
vi. Not available to Diplomatic/Official Passport Holders or Laissez-passer/ international travel document holders.
vii. Not available to individuals endorsed on Parent's/Spouse's Passport i.e. each individual should have a separate passport.
-
See the detailed steps above ior visit the website for further information.
-
No, https://indianvisaonline.gov.in/evisa/ is only the official website to apply for the e-Visa Services.
Note - Services of e-Visa are completely online and no facilitation is required by any intermediary / travel agents etc. It is advised not to believe or fall in trap of any such unscrupulous elements who claim:
speedy/express grant of e-Visa and charge money for it.
Do not share your personal information with any unauthorized website as it may lead to leakage of your personal data. Only visit the official website https://indianvisaonline.gov.in/evisa/ for e-Visa service.
For any clarification, you may write an email: indian-evisa@gov.in or call +91 11 24300666.
-
No, there is no fee other than the processing fee for e-Visa application and it is non-refundable. Please visit the Indian Visa Online website to know the fee applicable for your country as it is country-specific.
-
For e-Tourist Visa (01 year / 05 years), e-Business Visa, e-Medical, e-Medical Attendant and e-Conference visa, applicants of the eligible countries/territories may apply online minimum 4 days in advance of the date of arrival. Such application can be made 120 days in advance from proposed date of travel.
For e-Tourist Visa (30 days) , applicants of the eligible countries/territories may apply online minimum 4 days in advance of the date of arrival. Such application can be made 30 days in advance from proposed date of travel.
-
Yes. Immediately after you submit your e-Visa application and make the payment, you will receive a confirmation of submission of your application on the email id provided by you while filling up your application form.
-
Your e-Visa application may take 72 hours or more for processing. You will be intimated about your Visa status (Granted or Rejected) on your email id provided by you in the e-Visa application.
-
Yes, you may check the status of your e-Visa application by visiting the Indian Visa Online website and clicking on 'Check your Visa Status' Tab provided on the website.
-
The validity of e-Visa would be according to the e-Visa service you have requested in the application form as:
For e-Tourist Visa (01 year / 05 years), the validity would be 365 days / 05 years from the date of grant of ETA with Multiple entries and Maximum stay in India during one Calender Year should not exceed 180 days.
For e-Tourist Visa (30 days), the validity would be 30 days from the date of your first arrival in India. Double entries will be granted within the e-Visa validity period stamped on your Passport. Your first arrival must be between the date of issue and expiry of ETA.
For e-Business Visa, the validity would be 365 days from the date of grant of ETA with Multiple entries and continuous stay during each visit which shall not exceed 180 days and no registration would be required if stay is for a period of less than 180 days. However, if the intention is to stay for more than 180 days, then the foreigner shall get himself/herself registered with the FRRO/FRO concerned (https://indianfrro.gov.in) within two weeks after the expiry of 180 days of his/her arrival in India.
For e-Conference Visa, the validity would be 30 days from the date of arrival in India with Single entry.
For e-Medical Visa, the validity would be 60 days from the date of first arrival in India and triple entry will be allowed within the e-Visa validity period stamped on your Passport.
For e-Medical Attendant Visa, the validity would be 60 days from the date of first arrival in India and triple entry will be allowed within the e-Visa validity period stamped on your Passport.
-
No, e-Visa is non-extendable and non-convertible.
-
You may arrive at 31 designated Airports
i.e. Ahmedabad, Amritsar, Bagdogra, Bengaluru, Bhubaneshwar, Calicut, Chennai, Chandigarh, Cochin, Coimbatore, Delhi, Gaya, Goa(Dabolim), Goa(Mopa), Guwahati, Hyderabad,Indore, Jaipur,Kannur, Kolkata, Lucknow, Madurai, Mangalore, Mumbai, Nagpur, Port Blair, Pune, Tiruchirapalli, Trivandrum, Varanasi & Visakhapatnam, and 5 designated seaports (i.e. Cochin, Goa, Mangalore, Chennai and Mumbai seaports).
You may depart from any of the Indian Immigration Check Posts (ICPs).
-
The e-Visa application may take up to 72 hours for processing. For more enquiries on your e-Visa application, you can contact Indian Visa online at +91 11 24300666 or e-mail: indian-evisa@gov.in
The applicants are advised to beware of unscrupulous elements/ travel agents/ intermediaries in this regard. In cases where applicants have been asked for correct details or additional information where application is incomplete, the same must be sent immediately. If such information is not provided within 72 hours, the application is liable to be rejected.
-
Yes, ensure that your child’s passport is valid at-least for next 06 (six) months from the date of arrival in India.
-
e-Visa processing fee once submitted is non-refundable as the fee is for processing of the application and is not dependent on either Grant or Rejection of Electronic Travel Authorization (ETA)
-
No. You have already paid the required processing fee online. The applicants are advised to beware of unscrupulous elements/ travel agents/ intermediaries demanding extra payment.
-
This pertains to customs department.
-
Make sure you delete the browser history and cookies before trying to make payment. Also try to change the browser if the problem persists. In case you have already tried more than thrice, then you may have to re-submit the entire application form once again.
Payment Support helpline :
Axis Bank Technical support.
Email address: ecom@axisbank.com
Contact No Toll free Numbers from:
USA : 18552055577
UK : 0808178 5040
Singapore : 8001206355
Australia : 1800153861
UAE : 8000 3570 3218
Saudi Arabia : 8008500000
Qatar : 00800 100348
Bahrain : 80011300
For rest of the worldt: + 91-40-6717-4100
SBI ePay payment support provides technical support for all payment related transactions at +91-22-2753-5773 (24 x 7).
-
Please visit the Indian Visa Online website and click on 'Verify Payment/ Pay e-Visa fee'.
-
You have to upload the business card along with the details of Indian Firm/Company (which you intend to associate yourself with) for business activities.
For Sports Related Activity under e-Business Visa, please refer Instructions for applicant page for the list of documents required.
-
Business card means 'a card provided to you by the company you are working for' OR you can also upload 'an invitation letter from the company in India including company's information, address and phone number in India'.
-
A Copy of Letter from the Hospital concerned in India on its letterhead which includes the tentative date of admission/treatment in the hospital mentioning the name, nationality and Passport number of the patient/ e-Medical Visa applicant.
-
For e-Conference Visa, following are the required documents:
Invitation from organiser (mandatory)
Political clearance from Ministry of External Affairs, Govt of India (mandatory)
Event clearance from Ministry of Home Affairs, Govt of India (optional)
-
You may be allowed entry into India on the new passport even if ETA has been issued on the old passport with the condition that you must carry the new Passport and old passport on which ETA was issued.
-
No, You can only enter through the designated airports/seaports which are listed on the e-Visa website.
-
You have to put the Previous visa details in the application form as it is mandatory. You can write NA or Not Available or Not Applicable or any other suitable phrase according to you in the application form if you do not remember your earlier Visa number/details.
-
The Visa on Arrival facility is only for the nationals of Japan, South Korea and UAE (only for such UAE nationals who had earlier obtained e-Visa or regular/paper visa for India).
For the nationals of all other countries eligible for e-Visa, the e-visa application have to be filled online and the applicant must wait till the confirmation/Grant of ETA for travelling to India.
-
e-Visa processing fee once submitted is non-refundable as the fee is for processing of the application and is not dependent on either grant or Rejection of the Application.
-
Entry by cruise ship is allowed with the ETA through 5 designated seaports namely Mumbai, Chennai, Cochin, Goa and Mangalore seaports.
-
'Visible identification mark' generally means moles, birthmarks, permanent scars etc. which are visible and can be shown if asked for by the Indian Immigration Authority.
-
All the foreigners arriving in India within 6 days of departure from any yellow fever endemic country are required to possess (in original) a valid yellow fever certificate of vaccination.
List of Yellow fever vaccination countries <<< Click the underlined text or copy and paste the following into your browser: https://mohfw.gov.in/sites/default/files/Updated%20List%20of%20Yellow%20Fever%20Endemic%20Countries%20by%20WHO_0.pdf
-
The applicant must check all the details including Name, Nationality, Passport Number and Date of Birth, photograph/self image etc before final submission of e-Visa application.
The applicant would be responsible for any discrepancy irrespective of grant/rejection of e-Visa application. However, if any discrepancy found on ETA, e-Visa Support Centre may be contacted at indian-evisa@gov.in or call +91 11 24300666 for assistance at least 24 hours before the journey date.
-
The e-Visa is not allowed to be used for employment. You may apply for a Regular Visa.
-
The e-Visa is not allowed to be used for NGO activities and journalism purposes. However, Voluntary work of short duration (for a maximum period of one month, which does not involve any monetary payment or consideration of any kind in return) are allowed.
-
Only two e-Medical Attendant Visas will be granted against one e-Medical Visa (patient).


